MailPro+ Email Conversion Tool

This section will help you to find out how to use MailPro+ application to search and export numerous emails from MBOX, EDB, OST and PST files. Follow this simple step by step process of MailPro+ software to find files of different email clients and find out all about the multipurpose software.


SIMPLE MIGRATION

STEP 1


Run the MailPro+ Software & Add New Collection along with Collection Path & Description into the software to proceed further.

Zip-repair=-software

STEP 2

The Software provides Three Modes : Single File, Bulk Mode & Find Option to Load the desired file into the software.

windows-live-mail-converter-software
STEP 3

Now, choose the file that you need to export & Right Click to open "Export" or Choose Export Button on the Navigation bar to export selective folders into desired File format.

windows-live-mail-converter-software
STEP 4

Select from the desired file format (CSV,EML, HTML, MSG, PDF, PST & TIFF) to begin the Migration Process.

windows-live-mail-converter-software

ADVANCE (CUSTOMIZED) MIGRATION

STEP 1

Go to Start » All Programs » MailPro+ » MailPro+. Run MailPro+ software.

First window of the software will appears with two options:

  • Create a New Collection
  • Open Recent Collection

create new collection


STEP 2

Following screenshot appears while creating a New Collection in the repository. Fill in the required information; Title, Collection Path, and Description.

create new collection

Now, Browse location of collection in your local system where you need to save the exported results.

create new collection


STEP 3

By filling the required information, you can manage your E-mail Database efficiently. After filling the required information in all the provided fields, click on "Add" button.

add new collection
STEP 4

The pop up window will display the successfully added collection name:

new collection of data added successfully
STEP 5

MailPro+ option provides user with three different option:

  • Single Mode
  • Bulk Mode
  • Find
new collection of data added successfully

Single Mode

STEP 6

Single Mode

After filling the complete information of a New Collection, you need to select the desired email file type before the selecting the modes of the file.

Single File Mode: Using the single mode, you can add one file at a time.

select single file

Now Browse & Select the Desired file from Local system

select single file


STEP 7

After Browsing the Desired file format & Select "Add" Option to load the file into the software interface.

select single ost file
STEP 8

After adding file, the window will display the scanning process os the desirde file alongwith Collection Details such as Collection Name, Created On etc.

bulk mode

Now Click on the "View Tab" on the bottom of the window to preview all the data within files.

bulk mode


STEP 9

You can now Preview all the data alongwith attachments within the software Interface.

bulk mode


Bulk Mode

STEP 6

Bulk Mode

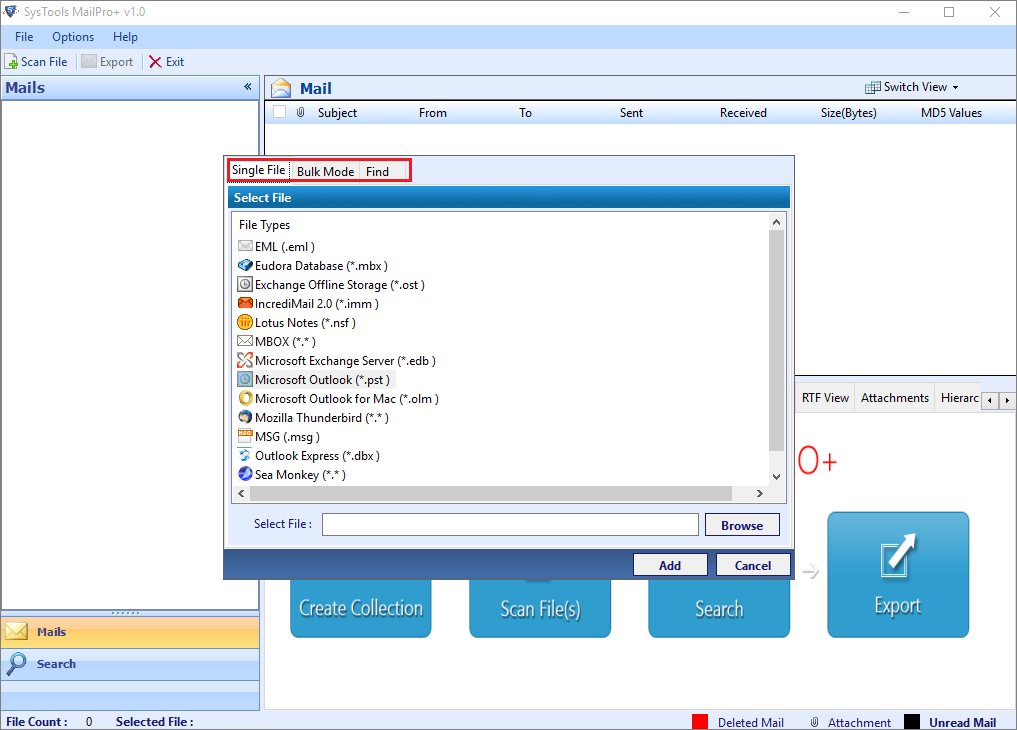
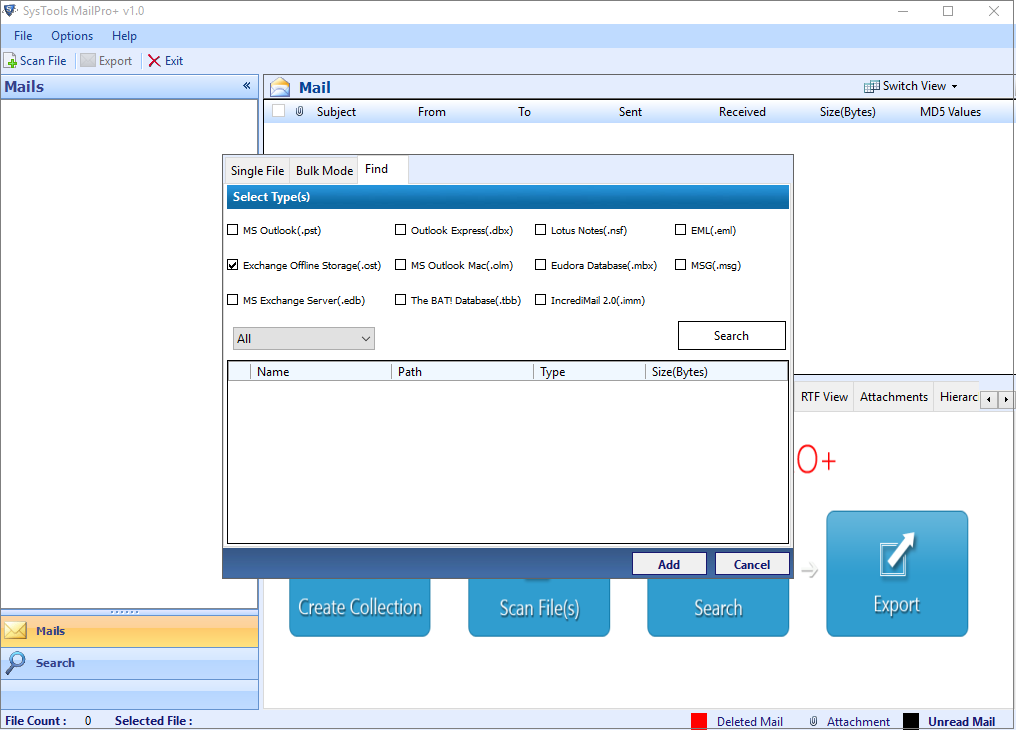
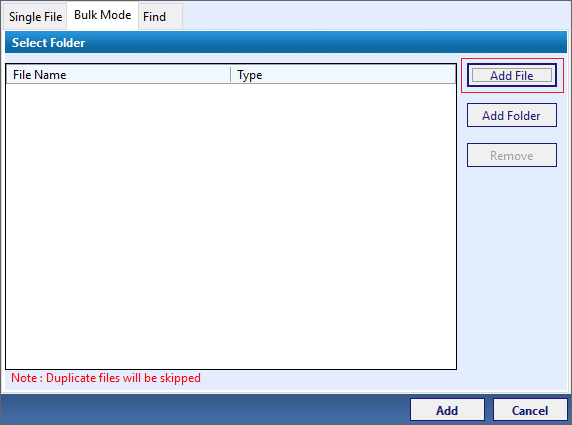
Bulk Mode: This option allows you to add multiple files at once.

  • Add File
  • Add Folder

bulk mode

Add File Mode

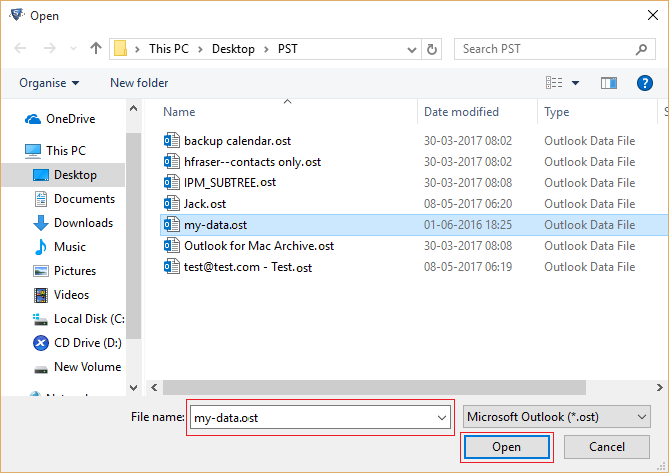
This option allows multiple selection of files can be done by using the Shift or Ctrl button during selection.

file mode

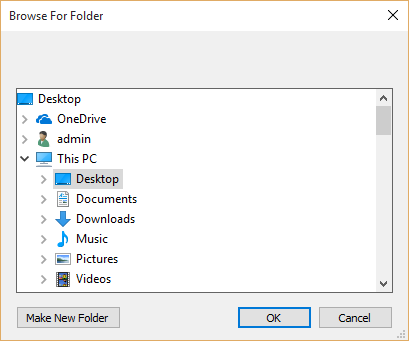
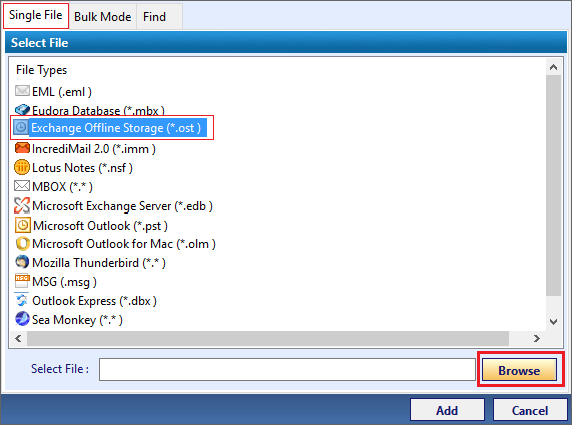
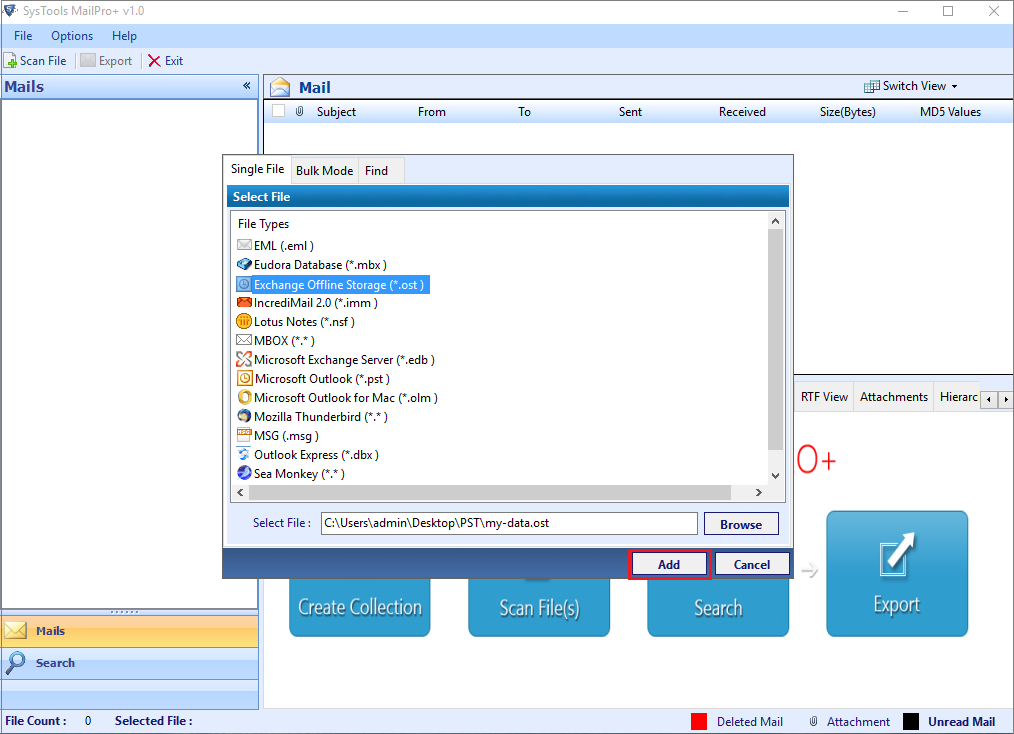
Now Browse the desired file from source location of the file stored on your local system.

file mode

Add Folder Mode

This option allows users to add multiple files at once. The software automatically fetches files from the folder selected.

file mode

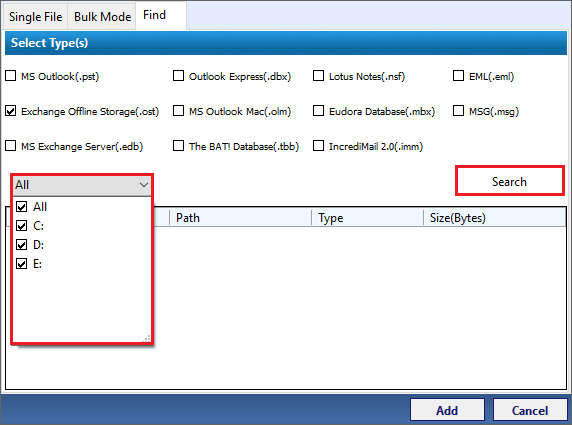
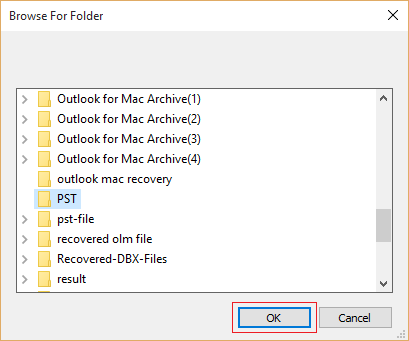
Now Browse the desired folder from source location of the file that consists of multiple PST File stored on your local system.

file mode

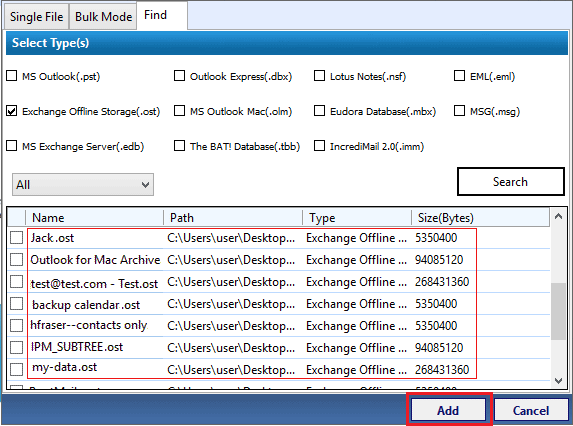
Select the "Add" button on the Bulk Mode Window to start adding Multiple file into the software window.

file mode

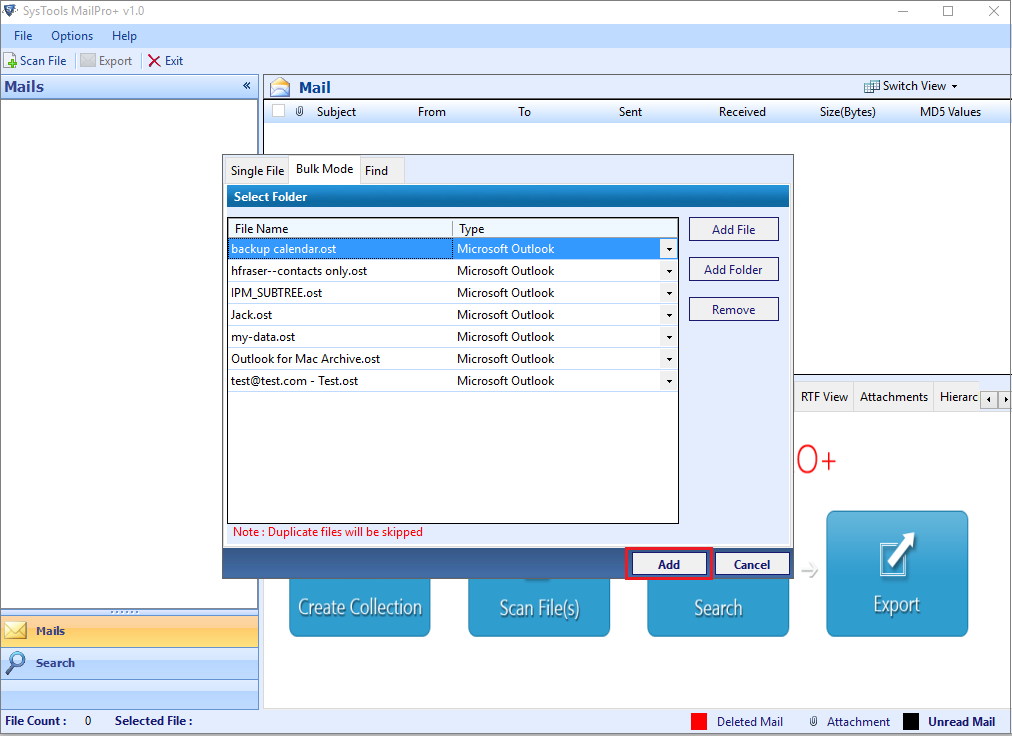
The software will skip adding multiple files , if any while importing files


Find Option

STEP 6

Find Option

Find Option: With this option you can select number of email file types. Click on the Search button.

find file
STEP 7

Click on Search button and find the selected email file type in the selected drives.

search file
STEP 8

From the selected files, you can export desired files into multiple email format respectively and then click on Add:

add selected file
STEP 10

After adding the selected files software starts scanning them with details like; Collection Name, Created On, etc., shown.

collection details
STEP 11

Now view the entire collection of mailboxes within the software.

view all
STEP 12

Preview of Data

Now view the entire collection of mailboxes within the software.

view all

Normal Mail View is set by default in the software to show emails in the usual way:

preview data
STEP 13

Attachment View of the email is shown below where you can view the embedded email attachment:

attachment view
STEP 14

Next, a switch screen view option is provided to you for changing the mode of screen from Conversation to Normal.

switch view
STEP 15

Conversation View displays the conversation view of the emails:

conversation view
STEP 16

General search is used for fetching information, relevant to keyword(s) used to search over; entire emails or selected mail attributes with required logical operator & any number of criteria used for narrowing the search result:

search
STEP 17

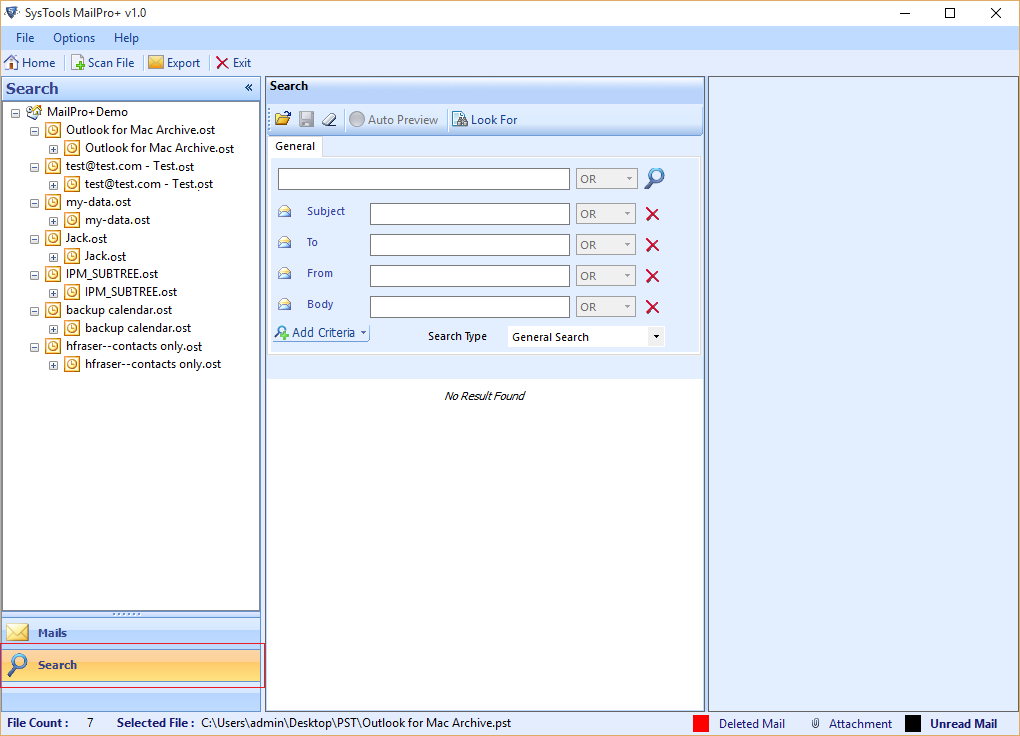
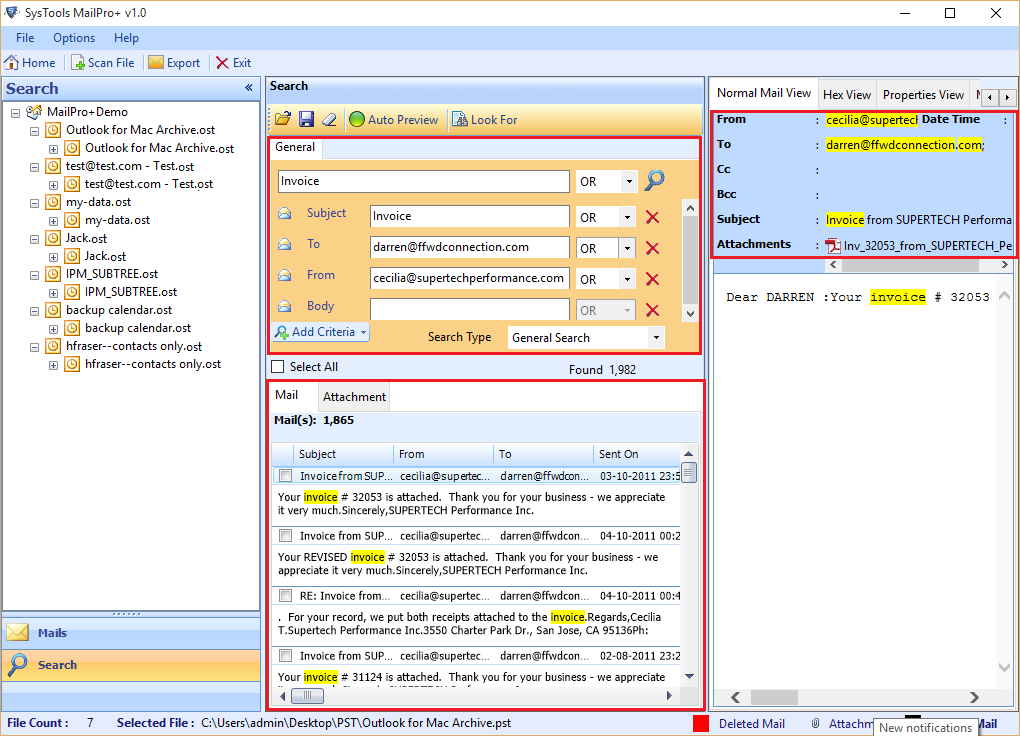
Following are the Logical operators; OR, AND, NOT that can be used to refine your search. Operators are used to create a relation between the two criteria:
OR Operator: Search will be carried out optionally between the two criteria
AND Operator: Searched term will be present in both criteria
NOT Operator: Searched term must not be present in the results

or and not
STEP 18

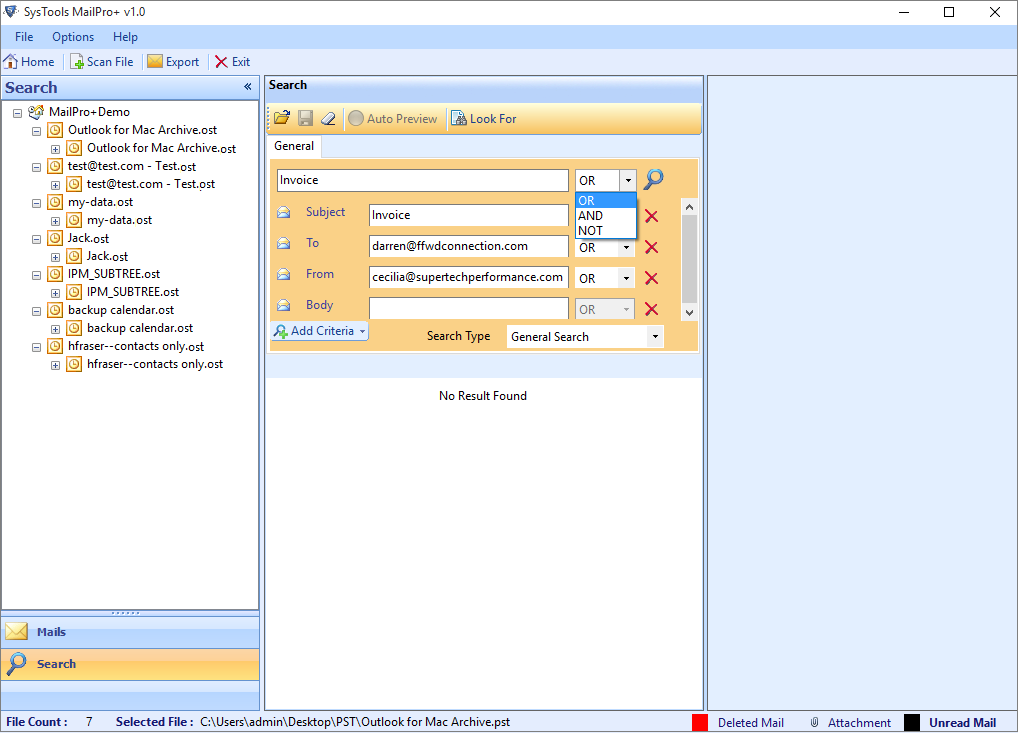
Add Criteria: Add the required criteria & fill it with the information you have, regarding that field:
"Subject" can contain your keyword.
"To, From, Bcc   Cc" can search for the entered term in email head.
"Has attachment" gives the option to select from yes or no.
"Priority" section has options of low, normal & to enter a start & end date.
"Body" section can searched for the term in email body.
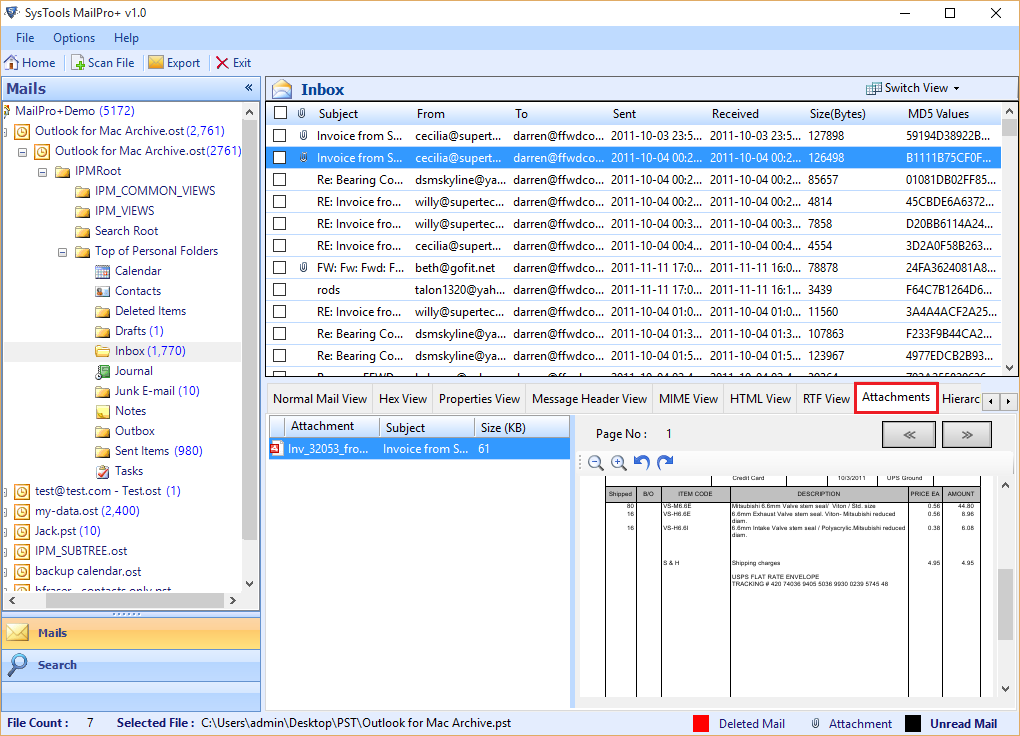
"MD5will search for the entered value in an MD5 value of email


STEP 19

Click on the Start Search button and the following emails will open with related keywords.

search result
STEP 20

Export Data

Click "Export" to initiate the process of exporting selected emails.

export selected emails
STEP 21

Select any one Export Option (CSV, EML, HTML, MSG, PDG, PST, TIFF) in which you want to convert the selected emails.

export options
STEP 22

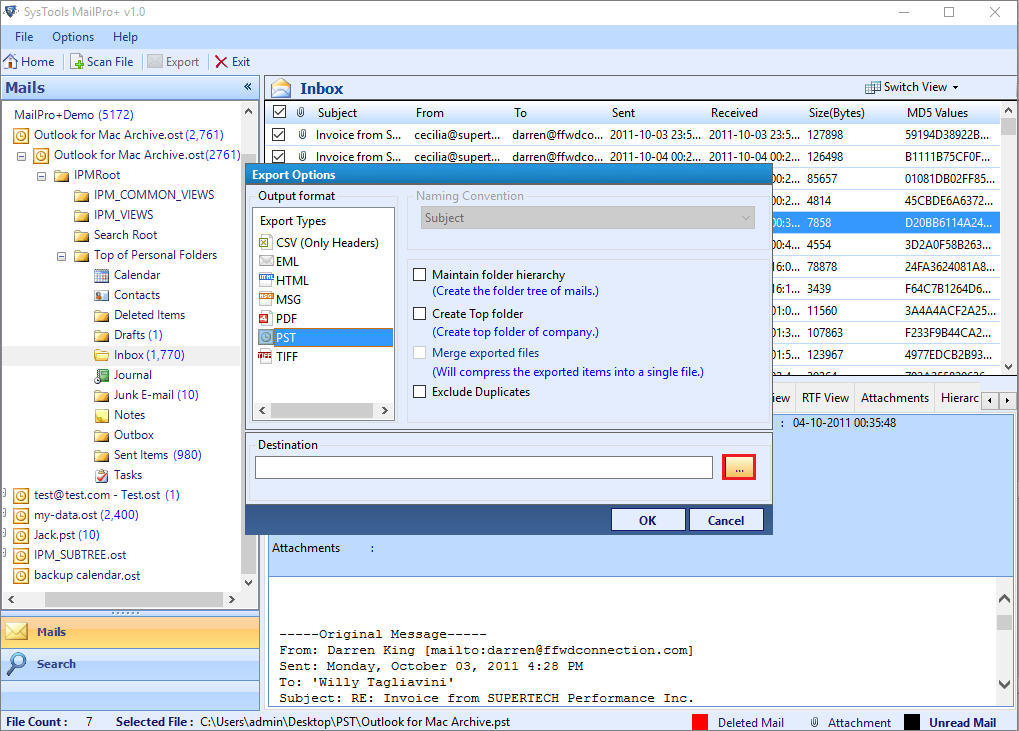
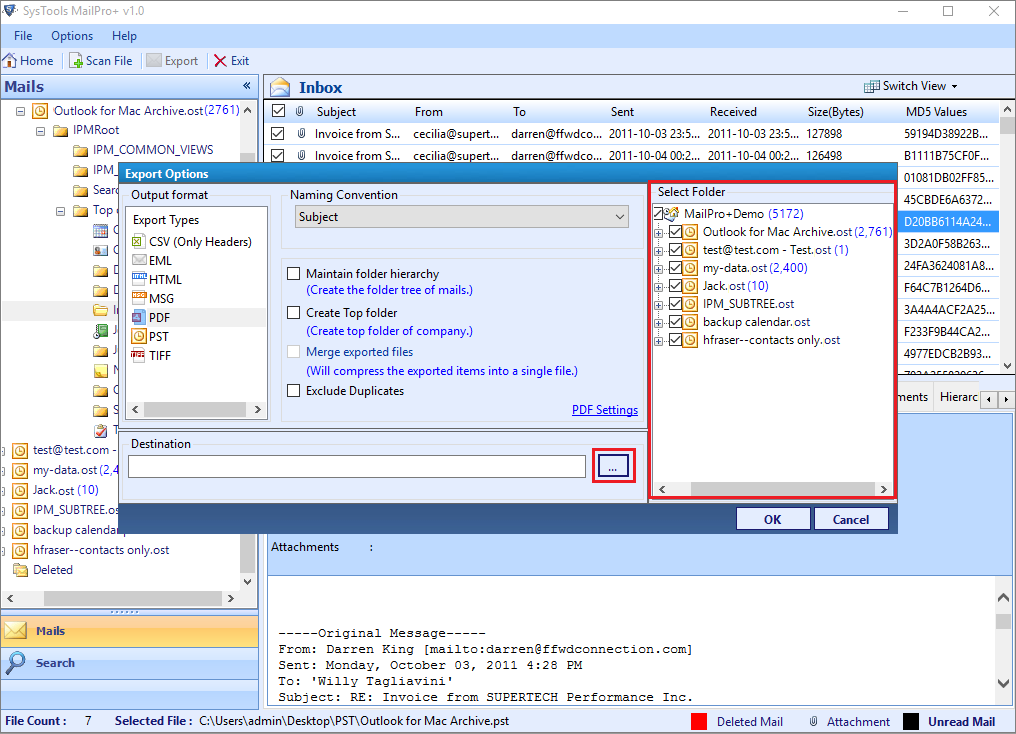
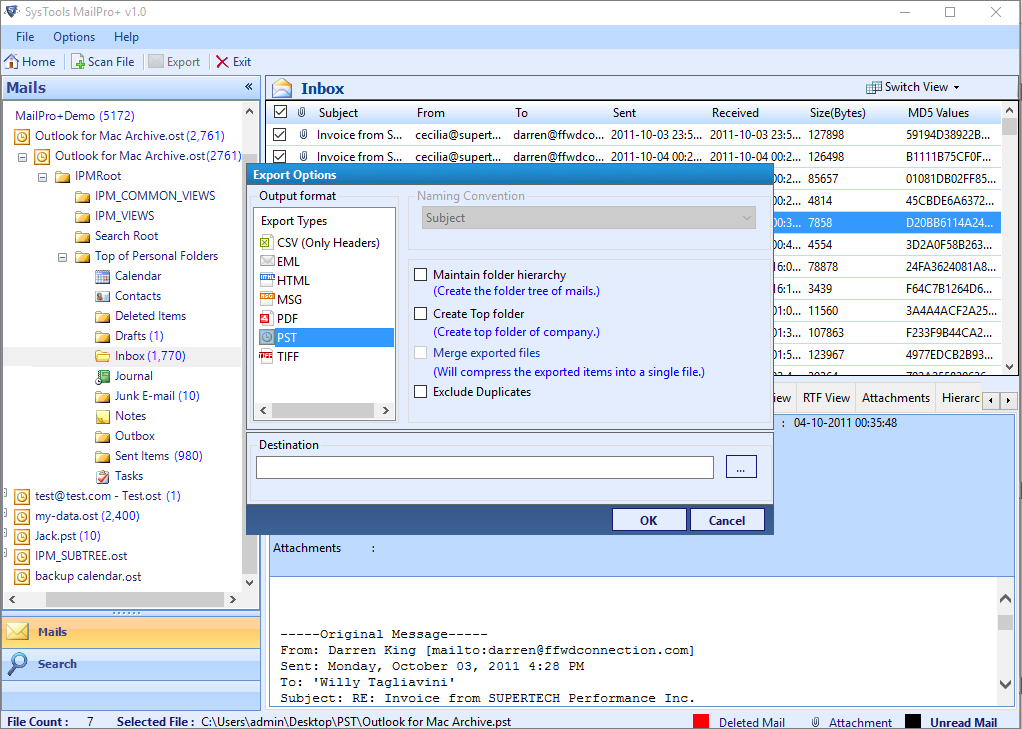
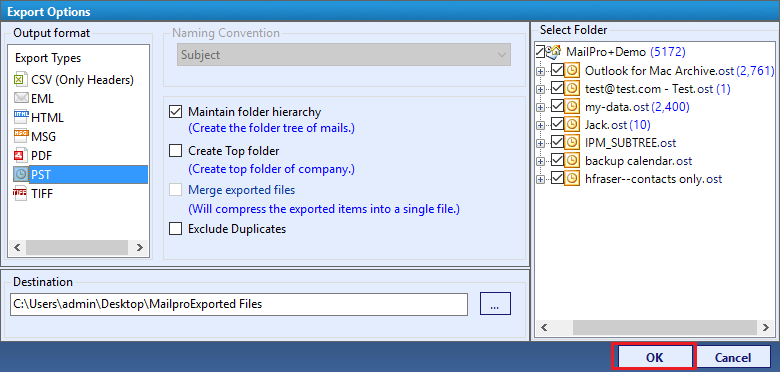
Maintain Folder Hierarchy: Creates a folder tree of all the emails
Create Top Folder: Creates Top folder according to the requirement
Merge Exported Files: Total files are compressed into a single file or merges multiple exported files in one location.
Exclude Duplicates: If you don’t want to include duplicate emails or data, check this option to exclude them.
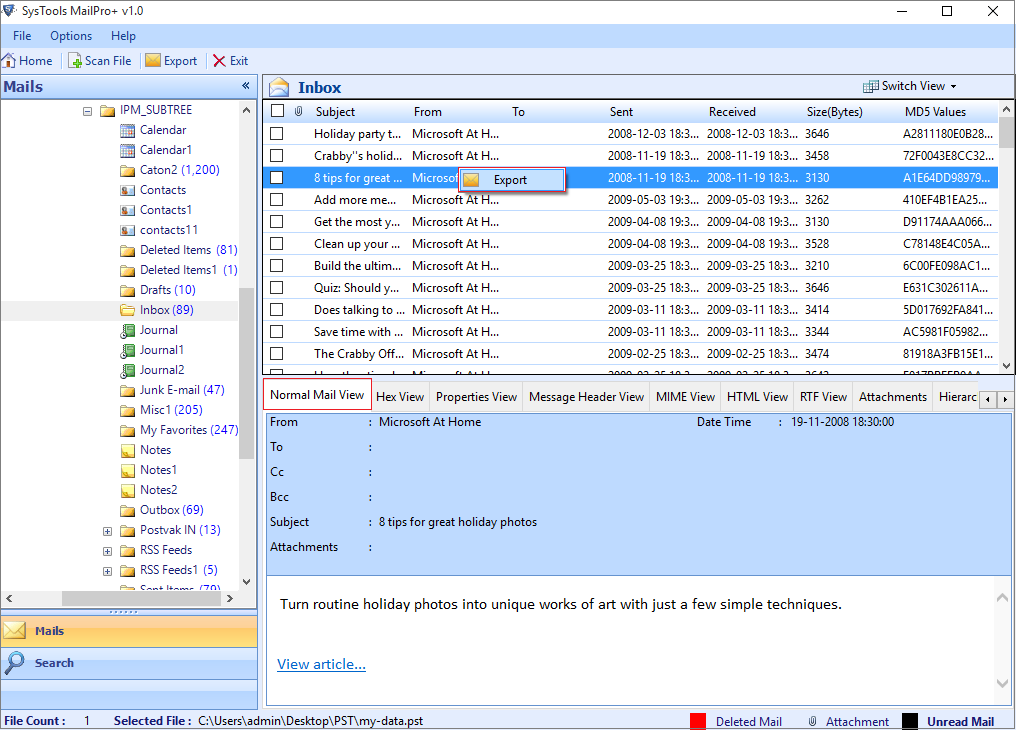
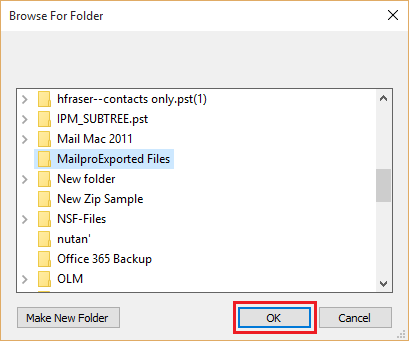
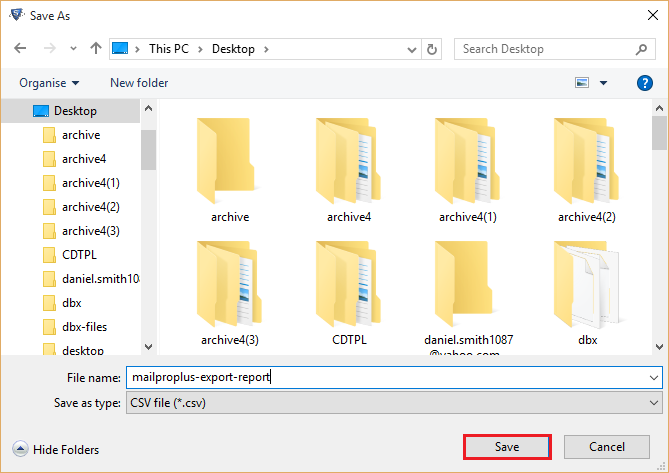
And then click on the Browse button for selection of the location where you want to save the exported files.

browse
STEP 23

Export Folders

For converting multiple folders, use the Export option from the navigation bar:

export selected folder
STEP 24

Select the folder or multiple folders from the right pane of the software, then choose a destination location by browsing the file and click on OK :

export folder
STEP 25

Now, choose a destination location by browsing the file on your Local system and click on OK :

export folder

After browsing the the files Click on "OK" to proceed.

export folder


STEP 26

After clicking on OK, a live Export Status, in terms of Export Count, is shown by the software.


exporting process

As the process completes, the following pop up window will display, with the process completion message with Total number of items Exported.

STEP 27

An Export Report is created for the complete export process. Click on Export to store this report on the local machine in CSV format:

save export report

Now, Brwose the location of CSV File on your system.

save export report


STEP 28

The notification message about the successful export process confirms the export. Click on OK:

export csv
STEP 29

Open the CSV File to view Details such as : Source File Location, Subject, Exported File Location & Export Status.

saved data collection


STEP 30

Navigate to the location where you saved the converted PST data file.

open outlook data file
STEP 31

First, run Outlook on your machine. Then Go to File Menu » Open » Outlook Data File...

open outlook data file

This will open a browsing window through which you can select the desired PST file. Select the PST file you desire to view & click on OK button:

open outlook data file


STEP 32

Thus, you can view the exported PST file in MS Outlook.

verify result